To set up a Cash App business account, you create a regular Cash App account, then switch it to a business profile in your profile settings, a process of 4 steps that takes under an hour. A business account accepts unlimited customer payments and charges 2.6% + $0.15 per payment received (3% for Tap to Pay). Here are the exact steps, the features you unlock, the mistakes to avoid, and how the fees compare with PayPal and Venmo.
How do you set up a Cash App business account?
Switching to a business account takes 4 steps.
1. Download the app
Start by downloading Cash App from the Google Play Store or the Apple App Store.
2. Sign up for a personal account
Before creating a Cash App business account, you need a personal account as the foundation. Open the app and enter your phone number or email address, link your bank account or debit card, and set up a unique $cashtag. The full walkthrough is in our guide to creating a new Cash App account.

3. Switch to a business account
Once your personal account is ready, open the business side as a linked account. Tap your profile icon, select Create a business account at the bottom of the page, then enter your business details, such as your legal business name, type, and tax identification number if you have one. The business account sits alongside your personal one, sharing the same login.
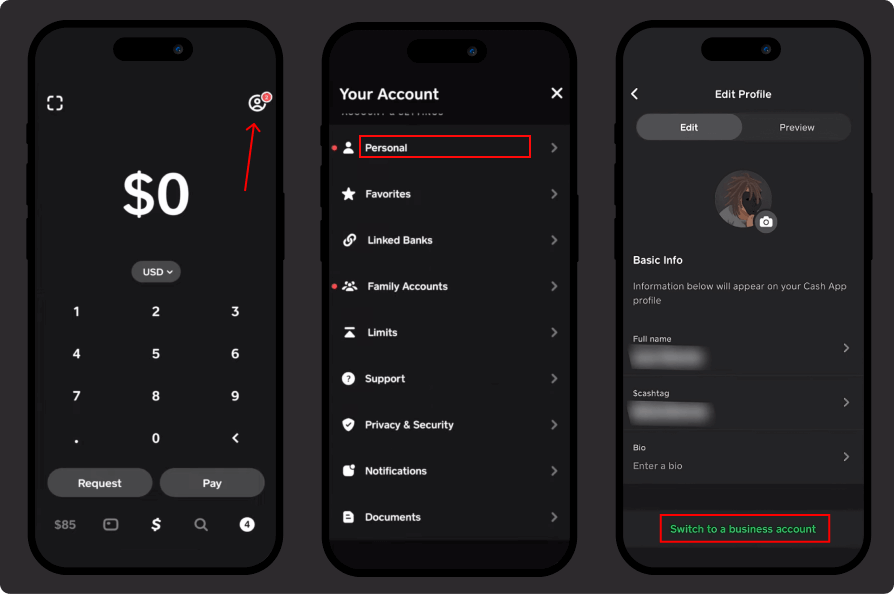
4. Verify your account
Verification unlocks higher transaction limits and keeps you compliant. Provide your Social Security Number (SSN) or Employer Identification Number (EIN) for tax reporting, and upload any additional documents Cash App requests. Cash App’s help center covers the verification flow if you get stuck.
What do you get with a Cash App business account?
A business profile unlocks five things a personal account does not offer sellers.
- Payment flexibility. Accept payments through payment links shared by email or social media, QR codes for in-person transactions, and direct $cashtag transfers.
- Analytics. Daily, weekly, or monthly transaction summaries and insight into your most profitable payment channels.
- Tax tools. Cash App tracks your business earnings and issues a 1099-K if you pass $20,000 across more than 200 transactions in a year, the current federal threshold. Export your transaction history for filing either way.
- Unlimited receiving. Unlike a personal account, there is no cap on incoming payments. Every other cap is in our guide to Cash App business account limits.
- Flat, predictable pricing. Cash App keeps 2.6% + $0.15 of each payment you receive (3% for Tap to Pay), with no monthly fee.
What mistakes should you avoid during setup?
The setup is simple, but three small details trip up new sellers.
- Incomplete verification. Inaccurate information delays higher limits and the tax tools.
- An unprofessional $cashtag. A random or informal $cashtag weakens your brand’s credibility with customers.
- Skipped security settings. Turn on PIN authentication and biometric locks before you start taking payments.
Changed your mind? You cannot convert the account back. Cash App’s linked-account model means your personal and business accounts coexist: open the in-app switcher by tapping your $cashtag at the top of your profile and pick the personal account, or, if you started as a business, select Create a personal account from the profile menu to add the linked personal side. Nothing needs to go through support.
How does a Cash App business account compare to PayPal and Venmo?
The receiving fee is where the three differ most.
| Fee | Cash App Business | Venmo Business | PayPal Business |
|---|---|---|---|
| Receiving a customer payment | 2.6% + $0.15 | 1.9% + $0.10 | from 2.99% + $0.49 |
| Instant transfer to your bank | 0.5% to 2.5% (min $0.25 to $1, max $75) | 1.75% (min $0.25, max $25) | varies by method |
Cash App stands out for ease of use for freelancers and small sellers, Venmo undercuts it on the per-payment fee, and PayPal costs more but plugs into far more checkout systems. If your customers already pay by $cashtag, staying inside the Cash App ecosystem is usually the simplest path.
Key takeaways
- Setup is 4 steps: download, create a personal account, switch to business in Edit Profile, verify.
- A business account receives unlimited payments and charges 2.6% + $0.15 per payment (3% for Tap to Pay), with no monthly fee.
- Cash App issues a 1099-K only above $20,000 and 200 transactions in a year.
- Verify with an SSN or EIN, use a professional $cashtag, and turn on PIN and biometric security.